Hello Guys,
If you’re seeking a seamless transition of your local files and folders to the cloud, or if you’re interested in the scalability, security, and performance benefits of Azure file shares, then the new feature of Azure Storage Mover could be just what you need. This fully managed migration service can assist you in migrating your SMB shares to Azure file shares with ease.
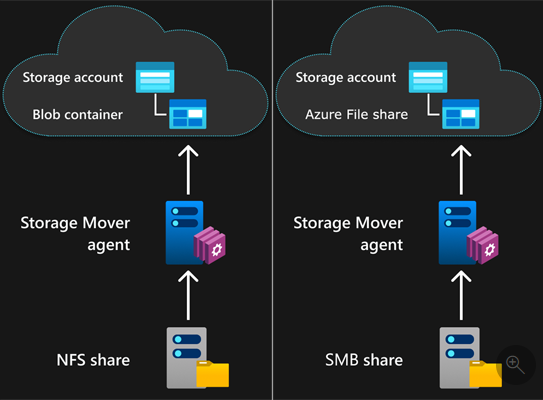
Azure Storage Mover is a hybrid service that consists of a cloud component and an agent component. The cloud component orchestrates the migration process and provides a user interface for creating and managing migration jobs. The agent component runs on your on-premises servers and performs the actual data transfer between your SMB shares and Azure file shares.
Azure Storage Mover supports many source and target combinations, including NFS to blob, SMB to file, and more. In this blog post, we will focus on how to migrate your SMB shares to Azure file shares using Azure Storage Mover.
Before you start, you need to have the following prerequisites:
- An Azure subscription
- An Azure storage account with a file share
- A Windows server with an SMB share
- A Storage Mover agent installed on the Windows server
- A network connectivity between the Windows server and Azure
To migrate your SMB share to Azure file share, follow these steps:
- Sign in to the Azure portal and go to Storage Mover.
- Click on New migration job and select SMB as the source type and File as the target type.
- Enter a name for your migration job and select your subscription and resource group.
- On the Source page, select your agent from the drop-down list and enter the UNC path of your SMB share. You can also specify a subfolder if you want to migrate only a part of your share.
- On the Target page, select your storage account and file share from the drop-down lists. You can also specify a subfolder if you want to migrate to a specific location in your file share.
- On the Settings page, you can configure some optional settings for your migration job, such as bandwidth throttling, encryption, compression, and more.
- Review your migration job details and click Create.
- Once your migration job is created, you can monitor its progress on the Overview page. You can also pause, resume, or cancel your migration job at any time.
That’s it! You have successfully migrated your SMB share to Azure file share with Azure Storage Mover. You can now enjoy the benefits of Azure file shares, such as:
- Scalability: You can easily resize your file share up to 100 TiB without affecting your workload.
- Security: You can protect your data with encryption at rest and in transit, as well as integrate with Azure Active Directory and Azure Key Vault for identity and access management.
- Performance: You can optimize your performance with premium tier, large file shares, and SMB multichannel.
To learn more about Azure Storage Mover and cloud migration basics, check out these resources: