Hello Azure Community,
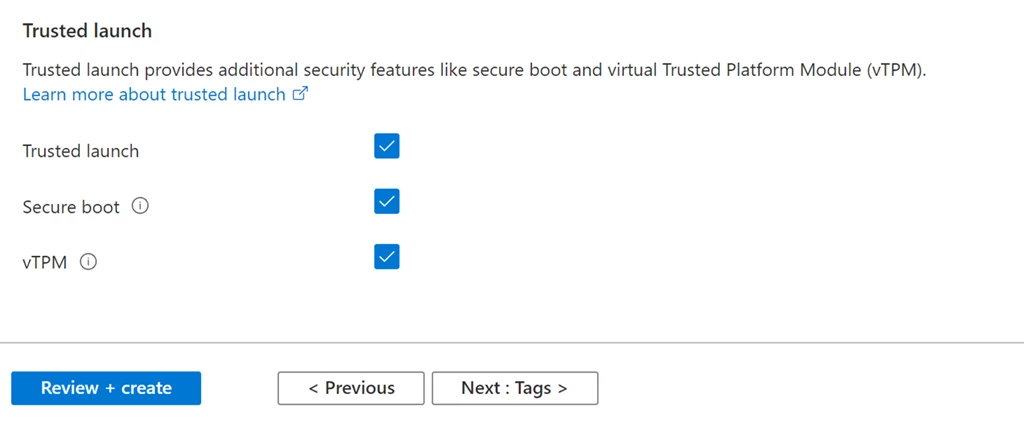
As cybersecurity threats evolve, ensuring that cloud-based workloads are protected against vulnerabilities is more critical than ever. Microsoft Azure provides Trusted Launch to enhance the security of virtual machines (VMs) with Secure Boot and virtual Trusted Platform Module (vTPM) features, helping to defend against rootkits, firmware attacks, and other sophisticated threats.
Trusted Launch is natively supported on Generation 2 VMs, but organizations running Generation 1 VMs can now upgrade them to benefit from these security enhancements. This guide outlines the necessary steps to perform a smooth transition while minimizing downtime and avoiding configuration issues.
Prerequisites
- Preview Feature Enrollment – Ensure that your subscription is registered for the feature Gen1ToTLMigrationPreview under the Microsoft.Compute namespace.
- Supported VM Size and OS – Verify that your VM size and operating system are compatible with Trusted Launch. Some OS versions, such as Windows Server 2016, Debian, and Azure Linux, are currently not supported.
- Azure Backup Configuration – If Azure Backup is enabled, it must use the Enhanced Backup policy. VMs using the Standard policy need to migrate before upgrading.
- Disk Encryption – BitLocker or any Windows OS volume encryption must be disabled before starting the upgrade. Encryption can be re-enabled after the process.
Unsupported Configurations
Some configurations prevent the upgrade process:
- VMs running production workloads (during preview phase).
- Unsupported operating systems and VM sizes.
- VMs using the Standard Backup Policy instead of the Enhanced one.
- Encrypted OS volumes (must be decrypted before proceeding).
Best Practices
- Test Before Applying to Production – Run the upgrade process on a test VM to detect possible issues before applying it to critical workloads.
- Backup Your VM – Create restore points to allow for rollback in case of unexpected errors.
- Optimize Disk Layout – Defragment the OS disk to reduce conversion failures during the process by running:
Defrag C: /U /V
Upgrade Procedure
1. Register the Preview Feature
To enable the feature in your Azure subscription, use the following PowerShell command:Register-AzProviderFeature -FeatureName Gen1ToTLMigrationPreview -ProviderNamespace Microsoft.Compute
Check the status of the registration to confirm activation:Get-AzProviderFeature -FeatureName Gen1ToTLMigrationPreview -ProviderNamespace Microsoft.Compute
2. Prepare the VM for Upgrade
Stop the VM before making any changes:Stop-AzVM -ResourceGroupName "YourResourceGroupName" -Name "YourVMName"
Disable BitLocker encryption to prevent conflicts during the upgrade:Disable-BitLocker -MountPoint "C:"
3. Upgrade the VM to Trusted Launch
Set the Security Profile to Trusted Launch for the VM:$vm = Get-AzVM -ResourceGroupName "YourResourceGroupName" -Name "YourVMName"Set-AzVMOSDisk -VM $vm -SecurityProfileType TrustedLaunchUpdate-AzVM -VM $vm -ResourceGroupName "YourResourceGroupName"
Enable Secure Boot and vTPM for additional security protection:Set-AzVMFirmwareType -VM $vm -EnableSecureBoot $true -EnableVtpm $trueUpdate-AzVM -VM $vm -ResourceGroupName "YourResourceGroupName"
4. Post-Upgrade Steps
Start the VM once the upgrade is complete:Start-AzVM -ResourceGroupName "YourResourceGroupName" -Name "YourVMName"
Re-enable BitLocker encryption if needed:Enable-BitLocker -MountPoint "C:"
Final Considerations
- Once Trusted Launch is enabled, it cannot be reverted to the Standard security type.
- Ensure that all prerequisites are met to avoid upgrade failures.
- The process requires temporary downtime, so plan accordingly.
By following this guide, Azure users can significantly improve the security of existing Generation 1 VMs, reducing exposure to firmware-level attacks while maintaining operational efficiency.
If you found this tutorial helpful, feel free to share your experience or ask questions in the comments! Stay secure and keep optimizing your cloud environments. 🚀